
After having discussed the main use cases in the last blog post, let’s now continue with some internals. In this blog post, we will discuss the architecture and the installation of Backstage.
Architecture
Backstage is structured around three core components: Core, plugins, and the application instance. The „Core“ provides the basic framework and essential functionalities like the UI interface, including elements such as the navigation bar on the left side. The application itself is a configured instance of a Backstage app, maintained by the platform team, integrating functionalities from Core and various plugins into a cohesive unit for production environments.
Plugins are vital, supplying additional functionalities either developed internally or sourced externally. These are divided into frontend and backend plugins. Frontend plugins are typically client-side React applications linked to the Backstage UI and accessible via specific URLs like „/catalog“ for the Software Catalog. These plugins export „Extension Components“ from the /backstage/plugins directory, which integrate into the frontend with routing information and metadata.
Backend plugins handle operational aspects and may incorporate services like caching systems and databases (primarily PostgreSQL or SQLite for production) managed within a Kubernetes cluster. Each plugin may create its logical database for isolation, enhancing the system’s organization and scalability.
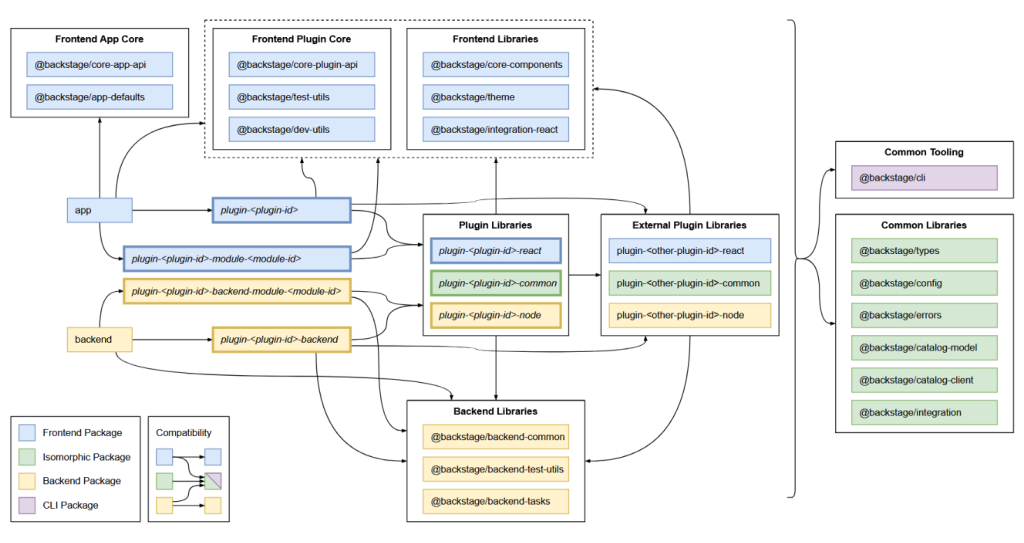
The architecture heavily utilizes npm packages to deliver libraries and structure the code, with both frontend and backend systems employing various packages to define plugin boundaries and facilitate their integration. This structure not only enhances the application’s modularity and scalability but also supports future developments and optimizations in the backend system.
The package infrastructure is depicted in the following picture.
Installation Considerations
In the following we will provide a detailed summary of deploying and setting up a version 1.15 Backstage instance using a Kubernetes cluster. The installation process begins locally, where Backstage can be installed on either a Linux system or through the Windows Subsystem for Linux (WSL). Essential tools required include curl, wget, yarn, git, docker, and the Node Version Manager (nvm). Nvm is used to install Node.js in its current Long-Term Support (LTS) version. The Backstage application, for example named „my-backstage-app,“ is created via the command line using
`npx @backstage/create-app@latest`.
The directory structure generated during this setup includes a `/node_modules` folder for Node.js project modules, and other critical folders and files like `app-config.yaml` and `app-config.production.yaml`, essential for configuration. These YAML files distinguish between test and production settings, allowing tailored configurations for different environments. Notably, `app-config.production.yaml` has the ability to override settings in `app-config.yaml` if similar settings are present.
Once installed, the application can be started locally using
`yarn dev`,
making the frontend accessible at `localhost:3000` and the backend at `localhost:7007`. At this point, the instance includes fundamental features such as the Software Catalog. Developers are free to further customize or extend functionalities from this base.
Integration with GitHub is essential for managing the Software Catalog. It necessitates setting up an authentication system within Backstage, typically configured for OAuth with GitHub. This setup involves registering the application in GitHub to obtain a client ID and secret, and configuring the `app-config.yaml` to use these credentials.
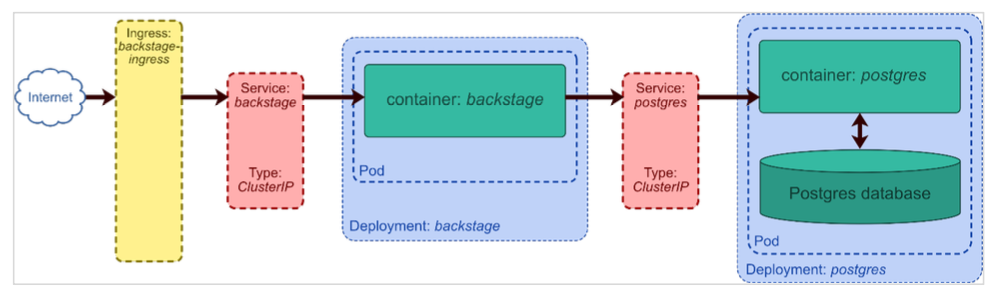
For deployment in a Kubernetes environment, `app-config.yaml` is further configured to specify PostgreSQL as the database, pulling connection details from the Kubernetes environment variables. It also ensures that backend requests are not upgraded from HTTP to HTTPS in the absence of a valid certificate.
The Kubernetes deployment is based on building a Docker image from the Backstage setup. This image is then pushed to a public Docker Registry. The Kubernetes configuration involves a series of YAML files that define the service architecture, including the setup for the PostgreSQL database and Backstage services, and the establishment of an ingress for public access. Deployment begins with the PostgreSQL database to ensure that the necessary database scripts run before the Backstage services start.
Finally, the entire setup within the Kubernetes namespace „backstage“ involves deploying the database, secrets, services, and ingress to ensure that Backstage is fully operational and accessible via a public IP address defined in the ingress configuration. This setup ensures that Backstage is scalable, secure, and ready for production use.
That’s it for today. In the next blog post, we will come up with some details for the installation.