vRealize Automation 8: Load Balancer – Overview


Introduction

With vRealize Automation, users can use existing load balancers as well as create load balancers within a deployment.

Before we show how to use existing load balancers or create new load balancers, let’s talk about the theory first.

Depending on the deployment type, different kind of load balancers are used. If you provision to a public cloud environment, vRealize Automation will create the appropriate load balancer (e.g. Elastic Load Balancer for Amazon AWS). If the deployment is for an on-premises environment and you have NSX properly set up, vRealize Automation will create NSX edges accordingly.

Features

The configuration is quite vendor-agnostic and provides the following features:

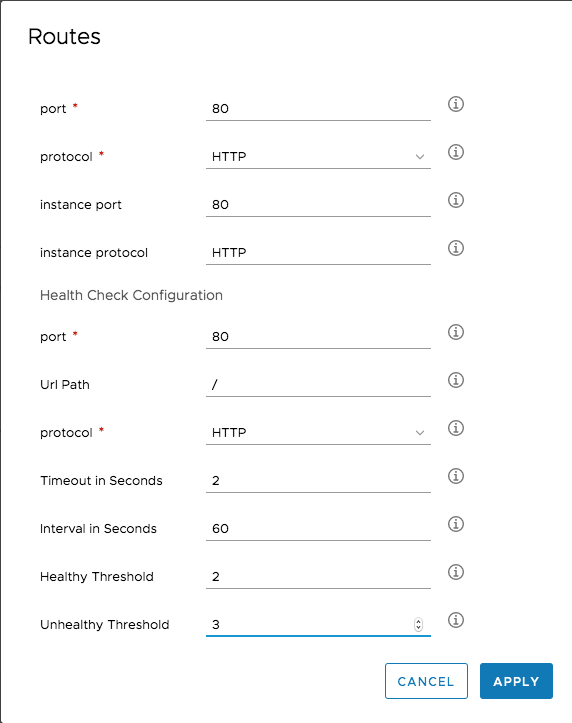
  • HTTP, HTTPS, TCP and UDP ports can be used. When using HTTP or HTTPS, the load balancer operates at the request level (Layer 7), if you go for TCP or UDP, the load balancer operates at the connection level (Layer 4).
  • In order to discover the availability of the instances, the load balancer supports health checks. This means , the load balancer periodically sends pings, attempts connections to test the virtual machines. When using HTTP for a health check, each virtual machine behind that is registered in the load balancer must respond with an HTTP status code 200. Otherwise, it will be consideres unhealthy. Health checks can also use other ports. When setting up TCP or UDP, an additional port has to be configured, to where a connection will be tried to be established. In addition, ICMP can also be used to periodically ping a machine. 
  • Health checks happen in intervals. When setting up a load balancer, you can specify the interval in seconds. In addition, you should set up an Unhealthy threshold, which is the number of continuous failed health checks before a load balancer machine is declared unhealthy. If a machine should be recognized as healthy again, a number of continuous successful health checks must be passed. This is called Healthy threshold.  You can configure the Interval in seconds as well, which is the time between two load balancer health checks. 
  • Load balancer can be internet facing or internal – a property that can be configured on the blueprint.

That’s it. Next we will show how to use load balancers on blueprints.

The image is a screenshot of a configuration page for routing and health check settings within vRealize Automation 8. The "Routes" section includes fields for "port" set to 80, "protocol" set to HTTP, "instance port" also set to 80, and "instance protocol" set to HTTP. Under the "Health Check Configuration," there are settings for "port" at 80, "Url Path" at the root ("/"), "protocol" set to HTTP, "Timeout in Seconds" set to 2, "Interval in Seconds" set to 60, "Healthy Threshold" set to 2, and "Unhealthy Threshold" set to 3. There are buttons for "CANCEL" and "APPLY" at the bottom of the configuration page.

vRealize Automation: Network Profiles – Outbound

Understanding Outbound Network Profiles in Network Configurations

The next network profile, we want to talk about is the outbound network type.

The configuration of the network profile is the same as for routed networks, so will skip the discussion here – the only difference is the configuration on the blueprint.

So what is the difference between routed and outbound?

Outbound networks limit network traffic to occur between the compute resources in the deployment but also allow one-way outbound network traffic.

Routed networks contain a routable IP space divided across available subnets that are linked together. The virtual machines that are provisioned with routed networks, and that have the same routed network profile, can communicate with each other and with an existing network.

Setting Up Outbound Networks: Configuration and Key Components

If you configure an outbound network, the following items will be provisioned:

  • A logical Switch
  • A DHCP Server
  • A T-1 gateway
  • One-to-many SNAT rule

In addition, a NAT route advertisement will be created.

Creating an outbound network from a blueprint is easy. The following snippet shows an appropriate blueprint:

formatVersion: 1
inputs:
  name:
    type: string
    title: VM Name
    description: Name of the virtual machine
resources:
  Cloud_Machine_1:
    type: Cloud.Machine
    properties:
      flavor: small
      image: Ubuntu1804
      cloudConfig: |
        #cloudconfig
        repo_update: true
        repo_upgrade: all
        package_update: true
        package_upgrade: all
        hostname: ${input.name}
        manage_etc_hosts: true
      networks:
        - network: '${resource.Cloud_NSX_Network_1.id}'
      name: Ubuntu
  Cloud_NSX_Network_1:
    type: Cloud.NSX.Network
    properties:
      networkType: outbound